Showing posts with label sewing. Show all posts

Striped Rag Quilt


I finally tackled making a blanket! *woohoo!*

I'm not sure why quilts and blankets have intimidated me for so long -- not that intricate quilts still don't -- but for how much I've read tutorials on them, I kept putting off trying to make one myself.

Rag quilts are sort of a beginner's quilting project, so when a friend of mine told me she was having a little girl, I REALLY wanted to make a gift that was more useful, and more of a keepsake, than what I've created so far. I followed this tutorial from Do It Yourself Divas, because it's awesome.

Follow that tutorial if you want to make one... I'm showing some pics along the way but not in that much detail.

I had this great collection of Riley Blake fabric called "Farm Fresh." It's awesome because it's girly, but not princess-ey... I can only imagine the princess stuff gets a little old. This flannel is super soft. You don't have to use a collection, you can totally pick your own styles, but it was rather nice having everything just *work* together so well.

To me, the most frustrating part is the first step: Cut a bunch of really long strips. Then cut some more. Then some more and while you're at it, how about some more? Yawn. It's hard to envison a cute quilt at this stage. Plus, I'm not good at keeping my lines precise when it's a very big piece of fabric... so I had to correct a few that went off. :-)

Finally when you're done with that, and you've sewn the strip fronts and backs together, you can lay out the design for your quilt. Then it starts looking like an actual something!


Sew those strips together...


(Yep, I left the selvedge on by accident... no problem though, just trimmed it all off after all the strips were sewn together, and evened out the edges.)

And then sew on a binding. I did this all with a sewing machine... hand sewing probably looks nicer but I have NO patience for that. For my first time binding, I'm really happy with how it turned out! I used this tutorial from Make It and Love It to do the binding. (LOVE her quilts!)


And then you cut little bits along the edges... and cut... and cut.... Having spring-loaded scissors really does help here, but my fabric was so thick that I had to cut it in 2 parts. This is where you'll want to watch TV or a movie.


Finally, put it in the washing machine a few times! Snip off the frayed threads between washings. They'll fluff up and be super soft.


The finished quilt! One side is smooth, the other has the frayed edges. It has a good weight to it, and is super soft and snuggly.


A close-up of the frayed side. I can see a thread I missed! LOL

I'm so happy that it turned out! I want to make more of these, definitely, but need a little break for the moment (they are very time consuming).

More baby stuff coming soon... lots of babies around here lately! :-)

Fabric Easter Baskets

Hey! Remember me? If not, that's okay... it's been a very long time since I posted (except to link to other much more crafty people).

I'm winding down from all the food, sugar and activities from this Easter. (Happy Easter!) I wanted to post about something I made that actually (1) turned out pretty cute and (2) was done in time! Even though I was finishing it up at 2am last night, it totally counts!

Last year, my boys had some cheap felt Easter baskets from Target. This year, I wanted to try and make something for them instead. I ended up with this:


Sorry, what follows isn't detailed enough to be a tutorial, but hopefully my description is enough to follow if you want to make baskets of your own.

You may remember this fabric as the IKEA curtains from my tote bag post. I love it! It's a great weight and the print is fabulous! The lining is a cute taupe cotton with white polka dots from Jo-Ann's.

I started by using a pattern for a hat in order to get the sides and bottom of the basket. You can use any pattern that you have, or draw something from scratch.

Using the pattern for a hat, (yes, this bucket hat... lol.... size extra-small), I created a pattern using the crown and the sides only. But, I added 2 inches of height to the hat sides (2 inches seemed like a good estimate).

I also cut an extra side from some batting, for stability and because I wanted this basket to feel a little bit plush.

I sewed those pieces to create the basket outside, and the inside. I also created a handle, eyeballing for size.... about 12 inches long is perfect. Then, I put the lining and outer "cap" together, right sides together, with the handle sandwiched in between right at the seam.

This is where I realized the basket would be too tall for my liking (that 2 inch estimation would have worked out better at 1 or 1 1/2). This was easily solved by sewing the two "caps" together with a large seam allowance - 1 inch - to make the basket shorter. I left a small gap to turn right-side out.


I wanted the outer fabric to have a lip, so, after turning inside out, I shifted the seam about 1/4 inch into the basket. (Did that make sense?) I think this helped make the lining look nice and puffy, too, because it has to bunch up a little. That pretty much worked out by accident, but I'll take it! I top-stitched it 1/4 inch all along the brim, to define and stabilize the lip. Then, I hand-stitched the gap closed, and it was complete!

All in all, I like how they turned out! They're a little bit floppy, but I like that about them. You could put wire or heavier interfacing in them if you want to add more sturdiness. You can play with the handle length (the first basket is 2 inches longer) - making it longer made the handle floppier. I found 12 inches worked well.

My boys really like the baskets and have been toting things around in them all day (especially candy)!


Sorry that I didn't finish these earlier to post them before Easter, but... well... this is just a really really early post for Easter 2013. Yeah, that's it!

IKEA curtain to tote bag!

I've been wanting to make a tote bag for awhile now, to see how easy/hard it is, and also because tote bags are one of the most useful things ever invented since, like, ... sliced bread? Okay, that doesn't work there, but I'm sticking with it.

Home decor fabric can get a bit pricey, but I've realized a great place to get some for cheaper is the As-Is bin at IKEA. The last time I was there, I raided that bin and came home with a couple of curtain panels and sheets. Not damaged in any way that I could tell, except one had some grommets all over it, so it must have been part of a display at some point.

I absolutely loved these curtains and had almost bought some for our house (but decided to go with plain white instead):

Henny Rand Curtains @ IKEA

I was so happy to find them in the as-is bin!

We are currently switching to a different day care, and I wanted to make something as a thank-you gift for E's wonderful teacher. She has has been so amazing with him (and become a friend of mine), and we will miss seeing her daily. (She's also like, 1 of my 3 blog followers... hee hee!)

I followed the tote bag tutorial found here at Sew, Mama, Sew!  I'm still super-slow to complete sewing projects, so it took me awhile, but it came out looking like it's supposed to. (I'm still at that stage where that's my definition of success!)

I love the pattern, and the weight of the fabric feels very sturdy.

I even totally goofed on something, and didn't realize it until posting this. The bag was going to have the stripes go horizontally, but it was late at night and at some point I forgot that, and turned it the wrong way. (Hmmmm! That explains my confusion at one of the measurements during the step where you add the pocket... ) But, it's not obvious since the dimensions are just 1 inch different between height and width. Yay for patterns that are idiot me-proof!


The biggest thing I learned from this? I hate measuring and cutting large pieces of fabric. I need to move to my dining table to do it, or something. It's so frustrating to try and lay things out to measure and cut them in the limited space on my craft table. And, because I'm shifting the fabric around a bunch, I keep goofing on lining things up. D'OH!


All in all, I'm very happy with the finished bag. Hope she can get some use out of this!

Holy Cr---!

I attempted something that resembled actual sewing. Like, something that's not just a basic shape or something. Something someone would wear.

I may faint.

AND, here's the kicker: it turned out resembling what it was supposed to. Dare I say... it's CUTE!

It's a hat! (Actually, a couple!)
Reversible Bucket Hats

On a whim, I recently picked up this book from Amazon.com . It's extremely well-written for the sewing simpleton like myself, and the projects are crazy-adorable. My sister-in-law, who is amazing with knitting, has made my boys some cute knit hats over the years... so I decided my first project from this book would be some hats to give to her and her adorable twin girls.

Now, when people who are actually good at sewing look at this kind of project, they say words like easy and whipped it up and stuff. Well, one day I hope to be at that level. But, I took my time and tried to not screw it up.

It's actually very forgiving. I think I did a decent job cutting (getting some more practice with the rotary cutter, which I'm starting to love), but somewhere in all the sewing I ended up with a little bit of wonkiness. So, there's a spot on one hat that bubbled out a tad, but honestly I don't think it's that obvious. And by the second hat, I'd figured out my issue, so that one turned out much better.

The hardest part was when it came time to attach the sides to the top. Attaching a tube to a circle shouldn't cause this much worry, but I kept pinning, staring at it , re-pinning, and so on. I got stressed that it wasn't one flat edge being lined up to another flat edge. But, I finally just started to sew and was amazed that it all lined up okay. It's sort of magic, and I'm just leaving it at that.

They turned out looking like actual hats. Like, not some lumpy piece of fabric that has a somewhat hat-shape, but an actual hat that you might see in a store or something. 

(If you can't tell, I'm having trouble believing this.)

My family kept asking where the hats came from, and when they'd hear that I made them, they'd say, "she MADE them??" and pick them up to look at them more closely - almost as if they expected to see it was some sort of optical illusion.

When we got home, I was on such a sewing-high (that's a thing, right?) that I made one more for C.

Dinosaurs make everything cuter!

and my adorable hat model himself

Ever say a word so much it starts to sound funny?

Hat.

More Burp Cloths and Rice Bags

I was really excited to finish off these burp cloths and get them sent out to my sister-in-law, who is expecting twins. The last set I made got a little delayed, and by that I mean the baby was born before I got those out the door. Whoops!

So, my sister-in-law loves a lot of geeky things (she fits in very well with my family) and one of those happens to be Superman. She's expecting twin girls, and even though this isn't her first pregnancy, I figured with the extra load of two babies, maybe some extra supplies might be handy!

So, here is the newest set of burp cloths:


I found this great pink Superman (okay, more like Supergirl) fabric online from Hancock fabrics, and even though I was trying to keep from doing tons of pink, it was TOO cute to pass up! The other two pink fabrics were from some quilting quarters that I had stashed away already.


There were two things that I wanted to tweak from the previous attempts at burp cloths.

One was the terrycloth. I needed some new terrycloth for these anyway, and since I really don't like what Jo-Ann's carries, I decided to try buying a towel and cutting it up. Target had these great towels on sale that were super soft. I almost wanted to just keep the towel for myself, it was so nice. It was a bit thicker than I'd wanted, but what the heck... I'm hoping the quality is good and that it doesn't disintegrate or anything.

The second thing was having some way to keep the layers from becoming bunched, shifting or bubbling after multiple uses. The cloths that I've made for my son were extremely handy, but after time started to shift a bit, and now some of them are pretty lumpy looking.

I tried a few things, like sewing two straight lines down the middle, but didn't really like how that turned out. Then I started playing with the fancier stitching modes on my machine and settled on this one:
Cute, huh? It sort of goes with the print on the fabric anyways. I did two of these on each cloth, 5 inches in from the short edges and (sort of estimated) at the center. Like this:


Paired them with a small rice bag, because pregnant women and new mommies have lots of aches that need soothing!


Burp Cloths

I started making burp cloths when we were pregnant with my son. I don't know if it was the nesting instinct or what, but I wanted to have something for him that was handmade by mommy.

They turned out to be so handy! I backed them with terrycloth and boy is that helpful when there's spit-up. I'm at the age where everybody I know is having babies, so I've started making burp cloths for them for their baby showers.

Just like me, the friends I have made these for have kept the gender a surprise, so I've made the burp cloths gender-neutral. Which worked out fine, as there's plenty of cute fabrics to pick from. (Unlike if you're shopping for baby items... I swear 90% of things only come in pink or blue.)

Here's a sample of some previous ones:

Made these for my son just using any random fabric I could find in the house. Some was flannel, some was knit, and some was plain cotton. The knit turned out to be my favorite - soft but absorbent.


Here's a set made for a friend. I LOVE the animal print fabric, and it was knit! Tried a knit backing on it too. Made it look a little "cleaner," but I'm not sure how it compares when cleaning up a mess.

Her husband is into things like Ford trucks and car racing, so as a joke I made him a "manly" burp cloth, too.


Yes, I'm also in love with the froggy fabric. It's from Walmart, I believe. This was for another friend, and I went back to the trusty terrycloth backing.

So, a cousin was expecting and they found out that they were having a little girl. I was excited to have a little change of pace and make something definitely girly. Plus, I had this beautiful fabric left over from another project. Here's how hers turned out!

They're super simple (probably even could say ridiculously simple) but so handy. They're wider than the burp cloths that I bought at Carter's. They're just rectangles that I made the pattern for, and made the edges curved. Sewed the print to the backing (terrycloth, knit, whatever you like) wrong-sides together, turned inside out, and finished off the edges by sewing around it again.

I've contemplated making the next set of them in more of a curved shape, so they go in a little at the middle and fit better on the shoulder. Honestly, I've never had a problem with the shape these are, but it might be even better that way. I think you could also finish it off a little nicer by adding trim around the edges, but these have the terrycloth around the edges which again is handy for cleaning. :)

I don't much care for the terrycloth I got from Jo-Ann's, because it's very uneven and scratchy. Once I use up mine, I might try just buying a towel from Walmart and cutting that up...

My sister-in-law is expecting twins, and although it's not her first pregnancy, I think she'll appreciate any help she can get. I found some fabric that I think she'll just ADORE. She's a geek like myself, so it's a ton of fun to get her gifts. That's going to be a follow-up post!

Rice Bags

Seems like such a weird idea... "hey, you're special to me... have some rice in a bag."

My sister made me one years ago, though, and I use it ALL the time! You can keep them in the freezer to use for cold therapy when needed, and pop them in the microwave for heat therapy. It's very soothing to tight muscles.

You see those kiosks in the mall everywhere, selling pretty much the same thing, but for a lot more $$ than it would take you to make them. Sure, they might be filled with other things like flaxseed, but that's nothing you couldn't also create.

It's very easy, and super cheap, which makes it a great gift for people that you can't budget much money for. Also, it's a great way to use up those smaller pieces of fabric you have laying around, or those patterns that are just a little too bold for most of your projects.

I made these awhile ago and didn't take pictures of each step, but will try to summarize in words instead.

What you need is: fabric (regular ol' cotton, something that can be heated), rice (I just get the generic supermarket white rice), and some tea bags. You can pick out the scents of tea that you like the best. I like going with Celestial Seasonings' Sleepytime Tea, as it's a blend of things like chamomile that are very relaxing. Peppermint would be great if you want more of a pick-me-up.

Sew up the fabric in a rectangle, leaving one of the short ends open for filling. It's your judgment as to the size, just remember that if you make it really big, it'll be a pain to microwave because it may not heat consistently. I would recommend double-stitching the bag, so if a seam pops open, you're not suddenly covered in rice...

In a bowl, pour in the rice. Then, take some scissors and snip open the tea bags. Again, it's your discretion of how many to use. The bags will be stronger for the first few uses and then taper off. When you heat them up, the scent of the tea gets released, so try not to go overboard either. Put in a few at a time and sniff-test to see how strong it is. (Try not to sneeze in the bowl - hehe!)

Mix the rice and tea, then pour into the fabric bag so it's about halfway full. This will make it more "shapeable" so that you can wrap it a bit around whatever muscle you are trying to soothe.

Fold over the unfinished edge and sew shut. You can hand-sew or machine sew this part. It's a little bit of a pain to machine sew and keep the rice from falling out at the same time, though. Again, double-stitch this part, to make it more durable.

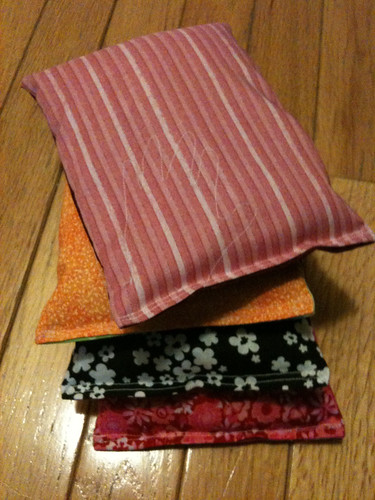
Here's an example of a few bags I made for my son's daycare teachers. I made them a little smaller so they could double as handwarmers when walking outside, so they're about 5x8 inches.


You can faintly see a stitched outline of my son's hand on the top bag, which I did before sewing the bag together.

New SIte!

I set up this blog on my own domain! You can now find it here: https://www.kabloobeley.com